


Bicycle-powered Centrifuge
Team: anonymous MIT students [JB], [KF], and [ES]
This content is presented courtesy of the students and used with permission.
- Welcome to Team Cyclone!
- Tackling the Design Process
- Prototype Video
- Going Shopping
- Construction Challenges
- We work best under pressure...
- The Morning Before
- MIT Museum
- It's Educational!
- Cyclo-Fuge is Great Because..
- The Final Event
- Off to Edgerton
- Lessons learned
- But how fast is it?
- Power point
- FDA / Future Iterations
Welcome to Team Cyclone!
by [JB]
The three of us, along with thirteen others, spent our spring break this year in Nicaragua. We rode in the back of a Land Cruiser through the mountains to public health clinics in different regions of the country, and checked them out--what resources they had, what health issues were most common. We asked questions: What is the most annoying technology failure that plagues health workers? Is there a problem we could fix by inventing a new device, to make their lives easier?
As we visited each clinic, we usually peeked into their labs, the places where bloodwork gets done. Several technicians noted that their hematocrit centrifuges, used for separating blood cells from serum, kept breaking down due to the malfunctioning of a small part. They also mentioned that the power goes out periodically, and they can't use their electric centrifuges during these times.
To solve this problem, Team Cyclone aims to create a new hematocrit centrifuge based on the pedal-and-gear system of a bike. It will be powered manually, with the potential to be powered by electricity if the user chooses. As we continue to work out the specs and build the prototype, we'll update this blog so you can see how we work!
Tackling the Design Process
by [KF]
The first part of our design process was to formulate a problem statement which allowed us to take a step back from focusing on why the centrifuges did not work in Nicaragua and allow us to focus on a more general problem. Our problem statement is as follows: " The mission of Team Cyclone is to develop a method in which the lab technicians in Nicaragua will be able to successfully separate blood cells from the serum."
From here we were advised to create a user profile and gain a better understanding of the demographic for which we were designing.
Maria J.
- 35 years old
- Good health
- Works alone - quick process or allow for multitasking
- Works in rural clinic - does not have much communication with regional center and experiences fickle electricity
- Lab Technician - follows directions, possibly trained but maybe not? Vague understanding of importance behind test.
Next we needed to make sure our device would be able to perform it's intended function. Below are the design parameter our devices needs to achieve to be successful. We contacted Amy Wong for much of this information.
1. How many RPM for a given radius?
From Amy's paper we see that "For xo = 7.5 cm and tubing filled with 100 μL of blood, we obtained a maximum of ~ 58 μL of plasma after 8 minutes of centrifugation."
We feel that a bike will be able to generate much more torque then an egg beater and thus shall be sufficient. After acquiring a bike, we will have a fixed parameter (the radius) and we will be able to more throughly answer this question by using equations formulated in Amy's paper.
2. How much blood is ideal?
200μl-1mL
3. How many samples processed at a time?
7-10 samples
4. How long is appropriate?
8-10 mins
5. How can we denote a successful separation?
One can see the serum separate from red blood cell.
Equipped with our problem statement, user profile, and technical specifications we began to brain storm. We bounced ideas off each other, some stuck and others were thrown out. In the end, we took our top four ideas and weighed them against the current solution and against each other. We gave each solution a point if it exceeded the current solution in a number of attributes. A more robust and easily repaired design received two points. We finished this process with two solutions. One was a foot powered centrifuge and the other was a dirt bike attachment. A major realization in this process was the fact that the blood samples need to spin on a horizontal axis to keep the blood from remixing after the process is completed. This gave us a clear project design and a focal point to move forward with the foot powered centrifuge.
A bike seemed like the most logical starting point. We first thought of using a gear system which could translate the vertical motioning into the horizontal plane, but quickly realized the complexity of this. Thus again we were met with the trade off of an easily repaired design with one of more complexity. We needed to find a less precise solution. We spoke with D-Lab Health mentors and decided to use a belt system to translate the plane in which the rotation is occurring. This system is perfect for our intended use because it is made to function with slack and works off the principle of not being precise. Success!!
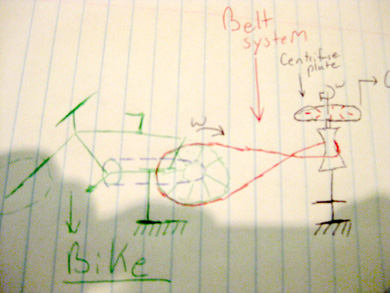
Sketch of the preliminary design.
The user will pedal the bike, thus causing the back gear to rotate. This will cause the back wheel to rotate at the same velocity, but will increase the torque because the wheel has a larger radius. This torque will be translated through the belt system to a disk of lesser radius to increase the rotational velocity.
Prototype Video
Here's our video on the prototype design:
Free downloads:
iTunes U (MP4 - 1.9MB)
Internet Archive (MP4 - 1.9MB)
Going Shopping
by [JB]
Once our team decided on a design, we made a list of all the materials we'd need to buy, and how much each would cost. We saved a lot of money by finding a used bicycle and retrieving scrap wood from dormitories. With our trimmed-down list, we drove to Home Depot.
Our design is somewhat flexible in that we need a stand to support the centrifuge, but it doesn't have to be a specific type of stand. Thus when we got to Home Depot, we spent some time looking at different materials we could use to build a stand. We finally decided on metal gas pipes, which come in various lengths, pre-tapped at the ends, and which fit all sorts of elbows and T sections and flanges. We were able to arrange the pipes to our liking on the floor of Home Depot, to make sure everything would come out properly.
We also bought latex tubing, a pulley, a paint roller, and a plunger. The plunger was an unexpected purchase; we needed a part to rotate with the centrifuge plate, but that would also fit inside the non-rotating pipe stand. The plunger handle fits well inside the pipe, and its head makes a nice platform for the centrifuge plate to rest on. All in all, we were able to get what we needed in one trip, and we spent only a third of our budget. The shopping trip was a success!
Construction Challenges
by [JB]
We've run into some challenges this week while building our prototype. Today especially, we had trouble with the bicycle itself. Our free bike had been tinkered with before we got it, so we have already spent some time removing parts that we didn't want. We also had to remove the tire on the back wheel. Today we discovered that, through the process of removing and reattaching the back wheel, something misaligned. Now, the back wheel rubs against the bike frame (not exactly the fast wheel we need). I think we might have bent part of the frame or the wheel itself. Tomorrow we'll go back to D-Lab refreshed and ready to try again.
Otherwise, construction is going smoothly. Our centrifuge stand is assembled and ready to be attached to the bike once we figure the wheel out, and we made the plate on which the tubes will spin today. I will post pictures soon.
We Work Best Under Pressure...
by [ES]
It's Friday afternoon. 1 pm. I arrive at E34 and immediately start fiddling with things. Our bike wheel has recently started rubbing against the frame, and we're panicked. We'll never get it going fast enough with this kind of friction. Gah.
I abandon this to work on our poster. After a few minutes, [JB] comes in and we discuss poster design. Theoretically, it should be to CopyTech in about an hour. We don't even have a functioning prototype yet. Gah.
Thankfully, Ryan lends us a hand and helps us re-evaluate our game plan. We start by fixing the rubbing. After determining that the frame was restricting the axle which meant the wheel was twisting, we were easily able to loosen the fittings and allow for free motion again. We solved our belt problem by simply cutting out part of the extra tubing, and we found a great and simple way to secure our plate (never underestimate the power of hot glue :)
I hop on just as Jose and company enter the lab. With [JB] holding the actual centrifuge device, I start to pedal. Like a beautifully choreographed dance, the centrifuge plate begins to spin. Fast. It keeps accelerating and while we can't tell exactly how many rpm it has, it definitely looks like "centrifuge speed." Success.
I jump off and we slap high five. While there is still much to be done, morale is high. We don't even mind the fact that we'll be coming back at 1 am.
The Morning Before
by [JB]
Recently, ES wrote about how we got the bike working on Friday afternoon. We came back late Friday night (after midnight) to do some finishing touches; we had been holding the setup together with our bare hands when we tried it earlier that day. We entered the lab, put all the parts together...and it didn't work.
Our belt kept snapping off the back wheel. We took the entire prototype apart and put it back together, but to no avail. Eventually, we were so tired that we couldn't think straight. We contacted some people to see whether they could help us in the morning, and then went to bed.
Saturday was the day we were presenting at the MIT Museum. All the D-Lab classes would be presenting, with prototypes and elevator pitches. In the morning, I headed to the lab, while [ES] and [KF] went on an epic adventure of their own to print our poster.
Once at the lab, I continued to tweak our prototype with the help of our instructor, Jose. We added and then took away the tension in the belt, reseated the back wheel, and all sorts of little things. When it seemed like we weren't going anywhere, we enlisted the help of other D-Lab enthusiasts hanging around. They proposed some radical changes to the design. I was a little overwhelmed by how quickly they came up with alternatives and then implemented them, changing the prototype before my eyes. In the end, however, we reverted back to the design we had started with. I figured out that a length of PVC pipe would do the trick. I held it under the belt as a guide so the belt was aligned with the pulley. After that, it was time to load our prototype onto a truck and meet up with [ES] and [KF] at the MIT Museum. We were about to show the public our design!
MIT Museum
by [KF]
Last Saturday we presented, along with the other Developmental Lab classes at the illustrious MIT Museum. The teams from all the class shinned as they presented the great work they had been doing on their projects. The D-Lab Health class was located towards the back of the meseum and had a constant flux of visitors throughout the convention.
We sent up and Amy Smith kicked things off by gathering everyone to the middle of the museum and introducing each class. Jose spoke about our trip to Nicaragua and handed it off to us to give an elevator pitch to the audience to come check out our booth. We had made a short powerpoint, but it didn't display. Instead of panicking, JB didn't miss a beat as she spoke about our project with intelligence and excitement.
There were many people at the "fair" who were very interested in our projects. Some were random people itching to see what MT students were up to these days, others were professors trying to integrate there own classes into our projects. All in all, everyone we spoke with was excited about the project and some even offered there thoughts for future iterations of the design. Through our own experience building the first prototype, speaking with class advisors, and presenting our work at the MIT Museum, we have complied the list below of future design alterations.
- Use V-shaped transmission belt instead of rubber band; it'll last longer and will retain tension better.
- Move small pulley lower to middle of big pulley; then keep shaft vertical. Slanted shaft will cause variable g forces.
- Change rotor from flat surface to a cone so that tubes remain in the same position during the spinning cycle. It'll also prevent from disrupting the pellet when taking out a tube that finished spinning cap-side down.
- Use steel wire and rubber lining along points of contact.
It's Educational!
by [JB]
I learned a lot from working on this project. That's a pretty broad statement, but it's true. As a group, we went through the entire design process, from assessing the status quo to working prototype. I personally went through a few different projects before starting on this one. I think it's important as a designer/inventor to keep an open mind and be able to recognize what projects will fit within your time limit and budget.
I also learned from building the prototype. We used a bicycle that had previously been tinkered with. That, combined with our own tinkering, caused parts of the frame to bend, and it became necessary to knock the wheel axle into its groove with a mallet. If we had used a new bike, it probably would have been easier to work with, but more expensive. So there's a trade-off between work hours and money spent. In the end, I definitely learned a lot more by going through the process myself than I would have if we read case studies. It's much easier to analyze a project and its potential once you've been there.
Cyclo-Fuge is Great Because..
by [JB]
Our prototype was great/saved us a lot of time because it was modular, and because it was easily adjustable. If we wanted to play with a certain dimension or tweak something, most of the time we didn't have to machine or buy a new part. I think that's a sign of a good prototype — it can be played with, so the final design is as good and as appropriate as possible.
The Final Event
by [JB]
Last Wednesday, we gave our final presentations to the class and our mentors. ES and I walked the bike over to the presentation room. Everyone we passed gave us funny looks because we had what looked like a beat-up bike with a strange platform on top, complete with a toilet plunger. Our presentation basically discussed why we picked centrifuges as a project, our design process, our manufacturing process, and how we would take the Cyclo-Fuge to market. I was nervous, but I knew the presentation was going to be our biggest opportunity, besides the MIT Museum fair, to show off the Cyclo-Fuge and get people interested in it. Once our group got to the front of the room, my nervousness disappeared, and our presentation and demo went well.
Off to Edgerton
by [KF]
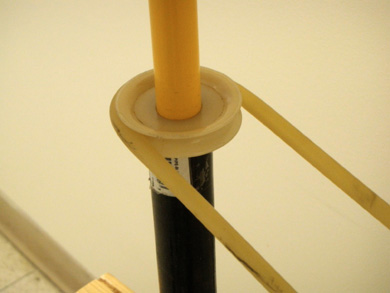
Pulley assembly for the centrifuge.
After assessing the materials we had purchased, we realized what we thought we could accomplish by simply drilling was no longer the case. The plastic piece we hoped to attach to the rod which held the centrifuge which the belt wrapped around. After talking to Dennis, the D-lab machinist, we agreed the best bet would be to mill the steel out and use the lathe to keep to piece concentric. If this piece was not concentric then the centrifuge would not spin evenly. Thus I took the piece home and planned to stop by the Edgerton Center in the morning.
The Edgerton Center is a student workshop at MIT open daily. To gain access, all you need is to have lab experience though classes or through a workshop held by the center. I had previous experience so all I need to do was attend a safety lecture about the shop. Luckily I had been planning on working there this summer so I had easy access to a lathe. The milling was easy, however keeping the part still in the lathe gave my quite some trouble. The plastic was thin so I did not want to deform it be clamping down too hard, and at the same time the thin walls did not give me much to grab on to. In the end I figured it out with some help from Marc, the head of Edgerton. I took it back to D-lab and my calculations were correct. The rob fit perfectly through it.
Lessons Learned
by [KF]
Over the course of my engineering career, I have been reminded on more then one occasion of the importance of having a fresh pair of eyes review my work. Many times, I am so focused on what I think I need to fix that I don't see the simple answer. This was the case one of the nights I was working with JB. As JB has stated in previous blogs, we had trouble with the alignment of the bike. First we couldn't remember how it looked before we took it off and secondly we were convinced that we could fix it with a little man power and tight screws. This was not the case, as ever time we got it going it would fall back out of alignment. The prototype was due in two days are we were scared. We needed some fresh eyes. Ryan, one of the mentors who was a great asset, took a quick look at the bike and realized a different peice was screwed in sideways. We realigned this part and everything else fell into alignment. I have two lessons to offer from this expereince.
- Taking things apart is a great way to learn how they work, however take pictures of things before you take them apart.
- Get a pair of fresh eyes to look at your work because they will always see something you overlooked. I guess it's human nature.
But How Fast is It?
by [KF]
After we had assembled the pieces and got the prototype working, we had to test how fast the centrifuge plate was moving. Originally we had calculated that the plate would move around 5,252 RPM. This number was found by assuming the average biker rides at a speed of 15 mph, with a bike wheel radius of 1.5 feet and a diameter of 1 inch for the plastic piece. ((1320 / pi) / .12) * 1.5 = 5 252.11312
These are the projects we had calculated, and now was the time to put our prototype to the test. We got the tachometer. We started pedaling. We touched it down. It read 5,000!! Success.
PowerPoint
by [KF]
I learned a great deal about PowerPoint through this project. I have always been a chalk talk person, I feel it is much more engaging. However, I was assigned by my group to put together to poster. After a half hour spent on Google searches to answer all my questions, I was ready to go. My first mistake was not setting the size of the poster before starting to add things to it, because after a while I realized I should have much more space then I allotted myself. This was bad because everything was now thrown out of dimension. I fixed this and moved on. Next I learned how to create arrows, change backrounds, etc... I was becoming a real pro. Below is our poster.
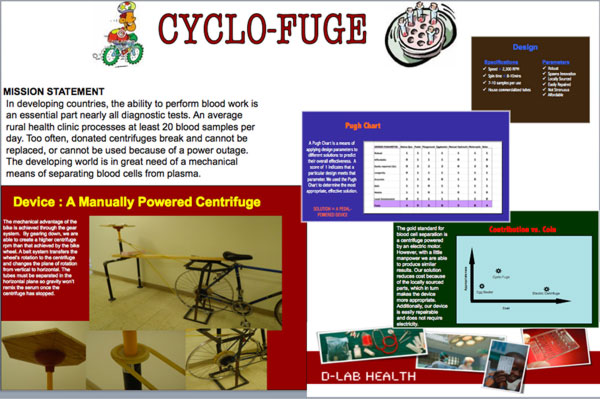
The Cyclo-Fuge poster
Higher resolution (150ppi) poster (JPEG)
FDA / Future Iterations
by [KF]
Our device is a hybridization of a bicycle and a hematocrit centrifuge. This device has a far way to go before anyone would consider spending the money to undergo FDA approval. However I believe this prototype has given the project a clear foundation to build from, and with this foundation an FDA application won't alter much with further redesign.
In 2007 FDA reclassified blood centrifuges from class III to class II (special controls). This means that new blood centrifuges are now allowed to cite presently marketed devices which have receive approval to benefit their claim. This is the path our device would take. We would issue for 510(k) clearance on the basis that our device performs the same function as pre-marketed hematocrit centrifuges. This would cut down on cost and speed up the process. And then hopefully be approved as a class II device.
Future implimentations as suggested by others have been discussed in previous blogs. However there were a few things I would've liked to implement if we had more time.
- A housing for the centrifuge plate. I would like this part of the device to basically mimic that which is used in the lab. The only difference is that it should be power differently.
- A digital read out to tell the user how fast he/she is going and maybe a time on the bike to let them know after 10 minutes.
- An incentive. There is a cool exercise bike at the gym where you play a game while you workout. On the screen you are in a race. We could use a version of this where we just tell the user what spot they are in and how far ahead the next person is. A simplier idea is to make something light up to let them know they're doing it right.
- Fill the seat and handlebars so you can see the centrifuge. If the casing is clear, the user would be able to tell exactly when the pack cell volume is seperated from the plasma.