


Nebulizer
Team: anonymous MIT students [RC], [PH] and [LO]
This content is presented courtesy of the students and used with permission.
- Problem Statement
- Descripción del Problema
- Sketch Model for Nebulizer
- Making a Video About the Prototype
- Working on the Prototype
- ZOMG! We Need to Order Parts! Pronto!
- Comments on Comments
- Experiments with Working Nebulizers
- Important Things we Need to Find Out
- Thermochromic Inks
- Experiment with Nozzle
- One-way Filter Design for Tube
- New Plans
- Contacting Nicaragua
- Designing the Mouth Piece
- Air Motors
- Designing the Mouthpiece - Part II
- Experiment for Testing Valve
- Finding CO2
- Last-minute Lasering and Public Presentation
- Found it!
Problem Statement
Nebulizers are used to aerosolize and deliver respiratory medications efficiently. This equipment works by pushing a stream of high velocity air such that it contacts the liquid and brings it up through a small orifice so small droplets are created and easily inhalable.
Current designs use an electric-powered compressor to generate the stream of air. The nozzle consists of three plastic pieces: a cup with a spindle to allow the stream of air to pass, a center piece to allow a small amount of liquid to mix with the gas and become aerosolized, and a covering that allows the stream to pass. With the large number of surfaces, even hospitals in developed countries have had problems with infection in using these nebulizers.
In Nicaragua, the issues are two-fold. First, in some regions electricity is not consistently available; furthermore, the motor is far too expensive for the hospital to afford more than a few. These devices break easily and are difficult to replace or fix. Second, although the nebulizers are sterilized as frequently as possible, they are of high demand, so the tube connecting the nozzle to the mask and the nebulizer cup and nozzle are often sterilized only once a day. Most children find that it is more comfortable to breathe from the tube itself. These two uses of the nebulizer provide a large risk of infection and contamination. Our goal would be to build a nebulizer that is either 1) disposable or easily disinfected to prevent higher risks of infection transfer and 2) powered by technologies that are available locally.
Descripción del Problema
Nebulizadores se usan para aerosol y entregar los medicamentos respiratorios de manera eficiente. Este equipo trabaja por impulsar una corriente de aire de alta velocidad tal que se pone en contacto con el líquido y lo lleva a través de un pequeño orificio tan pequeñas gotas y se crean fácilmente inhalables.
Los diseños actuales de uso de un compresor eléctrico para generar la corriente de aire. La boquilla de plástico se compone de tres piezas: una taza con un husillo para permitir que la corriente de aire a pasar, una pieza central para permitir que una pequeña cantidad de líquido para mezclar con el gas y se conviertan en aerosol, y una cubierta que permite pasar el arroyo. Con el gran número de superficies, hospitales, incluso en los países desarrollados han tenido problemas con la infección en el uso de estos nebulizadores.
En Nicaragua, las cuestiones son de dos clases. En primer lugar, en algunas regiones no se recoge la electricidad disponible, además, el motor es demasiado costoso para el hospital a pagar más de unos pocos. Estos dispositivos se rompen con facilidad y son difíciles de sustituir o reparar. En segundo lugar, aunque los nebulizadores son esterilizados con la mayor frecuencia posible, son de gran demanda, por lo que el tubo que conecta la punta de la máscara y el nebulizador taza y la boquilla suelen ser esterilizadas sólo una vez al día. La mayoría de los niños encuentran que es más cómoda para respirar desde el tubo en sí. Estos dos usos del nebulizador un gran riesgo de infección y contaminación. Nuestro objetivo sería construir un nebulizador que sea 1) desechable o desinfectarse fácilmente para evitar mayores riesgos de infección y de transferencia de 2) impulsado por las tecnologías que están disponibles localmente.
Sketch Model for Nebulizer
by [LO]
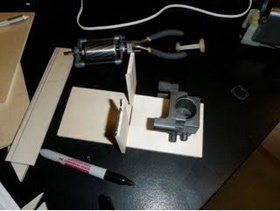
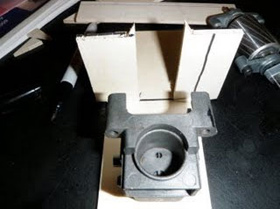
After cramming two weeks of work into this weekend, we proceeded immediately to making the first model after coming up with initial design/solutions. Immediately after class, we met at WiLG and decided to pursue the more "cleanable"/autoclave-able design. Our team hopes that by creating a nozzle/nebulizer with fewer nooks, it could be simply cleaned by dipping or soaking it into a solution of bleach or by other quick cleaning/drying processes. This will allow the Nicaraguan hospital wokers to sanitize the device more frequently.
With a collected plastic cup, toliet paper rolls, shoe box, tubing, and lots of tape and glue, we assembled the nozzle. The shoebox and pop bottle represent the whole functioning motor. The cup represented the medicine cup and within it, sat a nozzle for air and a centerpiece that allows for mixing and aerosolization of the liquid. This center piece was redesigned to remove the extra spokes, which function only to keep the piece in place. In place of spokes, we reshaped the first tube leaving the medicine cup as a cone/funnel so the tip can be close enough and small enough to keep the centerpiece in place, but allow the fluids to flow through. Included in the connecting longer tube is a valve that allows only one way flow, so contamination from the patient can be prevented. We hope to test this to ensure that this method actually works.
The individual modular parts were quite easy to make; however, the assembly aspect was difficult. With just elmers glue and tape, we managed to keep the parts together. Specific and details in the nozzle were difficult to recreate, so they were represented just as a singly slither of cardboard. Our effects were quite effective. In the end, we were able to create a good representation of our device; however, there's still a lot to do in ordering materials, fabricating, and testing our device.
Making a Video About the Prototype
by [RC]
Free downloads:
iTunes U (MP4 - 13.1MB)
Internet Archive (MP4 - 13.1MB)
To help you understand how this works, we have a made a video. It is very entertaining and highly informative. It showcases our sketch model, an accurate representation of what we intend to build. We describe how each specific part of the device will work, why we built it, and how it is cost effective as well as how it will lower the risk of infection in patients.
In our video, we also show a diagram of the device, complete with arrows that show where the air flows.
We begin the video with an introduction to the device and description of how the air motor works. Here we also show a diagram of the air motor. We feed in a source of air (e.g. carbon dioxide (CO_2), which is found in soda bottles) into an air compressor. The air compressor then outputs some air, which will turn a rotor. This rotor is attached to a pump. When the rotor turns, it will be raising and lowering the pump at a very high speed. This will push a stream of air through a tube, to a nozzle. This part has a compartment where the liquid medicine can be placed. The air coming into the compartment will aspirate the liquid medicine, turning it into small particles. The particles will flow through a one-way valve (aimed at controlling infection), then through either a mask or a mouthpiece. The patient will breath in the air either through the mask or the mouthpiece.
We hope that this video will help explain how the device is supposed to work. We put several hours of work into creating this video, and we hope you enjoy it.
Working on the Prototype
by [PH]
For the final D-Lab Health project, our group (Team Nebula) is making a better version of the nebulizers we saw in Nicaragua. So today, we worked on a model we could use to explain our vision.
It started pretty well, with a meeting to discuss our project, make a budget, and generally try to model our problem. But unfortunately, my 24.900 (linguistics) pset took all night, and I was running drastically low on sleep. So I went out and bought some caffeine and some rope (for an unrelated project).
By the time I had gotten back, [LO] had finished a draft of the budget, which I then looked at. Shortly after, [RC] joined us at WILG. [LO] and I had made a few of the preliminary parts out of cardboard, which was free and plentiful. Also, it's a remarkably good modeling material, because it's so rigid.
We then worked for a while, and finished most of the parts. We used a plastic cup to represent the nozzle, because we needed parts that tapered off along their side. Other materials used were a shoebox and paper. When we were about finished, I remembered that I had some tubing left in my room, so I left for East Campus to get the remaining materials.
A short side note: tape is amazing. No matter what you have, as long as you add enough tape, it will stick.
After about an hour, we met again at East Campus where we shot the video of the prototype. There's this really excellent video of me making a horrible sound into the camera. I really hope that makes the final cut.
What was really hard about this process was the ability to visualize what we were making without the actual parts used to make it. I guess that's why we ended up with something that looks like a vacuum cleaner?
ZOMG! We Need to Order Parts! Pronto!
by [RC]
Hola. We are stressing out about finishing a prototype (or even a working model) on time. We have begun the process of creating a budget and ordering parts. We should probably do that soon (like today) so that we can get the materials as soon as possible. As always we are very excited about developing the prototype - we are anxious to start building.
Comments on Comments
by [LO]
After receiving back comments on the video, we realized that there were many good suggestions. I think the cardboard/paper mouth piece would be a great idea. We'll have to test it to make sure that fluid actually flows properly. I think the idea of using color as an indicator of cleaniless/dirtiness would be a great idea.
After doing some brief searching, we found Chromatic Technologies Inc. We sent them an email about our project and hope to obtain samples.
A fun clip was added to the end of our video to make the experience more fun. To keep the professional level, we've removed those clips and renamed our team Nebula. The video has been reposted on the dropbox.
Our plan of action today is shown below
- Test the cardboard mouth piece
- Test "value of each of the nebulizer pieces by removing them.
- Sketchup our nozzle after our tests to determine what is necessary and what is not.
Experiments with Working Nebulizers
by [LO]
After some urgent tests, we realized we may have to rethink our concept for the nozzle on the nebulizer.
1. Testing cardboard mouthpieces
- We built a quick mouth piece by rolling up a piece of cardboard (taken from a glove box) and taping it together, then squished one end slightly to create a mouthpiece shape. This is to create a more comfortable mouthpiece.
-Our findings show that it is better to connect over the tube because there are no leaks even though the fit may not be snug. For connection within it, leaks do appear.
-We ran the nebulizer for about 15 min (typical usage time) and then felt the materials for moisture. It seems as though cardboard had about the same moisture content as plastic and could survive the duration.
2. Cardboard connecting tube
-we made another tube out of cardboard and poked a hole through it to fit onto the nebulizer cup. It worked just as great as a normal one!
3. Essential pieces
-We removed pieces of plastic on the center piece and on the cap and tested different combinations.
-normal cap, missing spokes on centerpiece: works fine, but the center piece jolts up and down slightly, making for an annoying experince. Also larger bubbles are created in teh solution itself
-missing piece on cap, normal centerpiece: disaster, water droplets are large; fine mist is not created. This means that a bulb is necessary for the cap or some small area is also essential for the aerosolization of fluid
-missing piece on cap, missing spokes on centerpiece: same result as above.
4. Further study of a different nebulizer nozzle
-To better understand this, we carfully looked at a second nozzle made by Omron. It's design was different. A baffle was present at the nozzle tip. Oddly, mist came from the taller stack even though the nozzle was open to the short stack. We tried to do some patent searches to determine why this may occur, but we couldn't find omron's patent. More searches may be necessary for the nebulizer itself
Today's work session wasn't too difficult. The most difficult part was finding correct supplies to cut the tape. We couldn't find the scissors, so wirecutters were a great substitute; however, we've realized that there's a fundamental concept missing from our design, so it won't work. We need to re- meet and re-direct immediately.
Important Things we Need to Find Out
by [RC]
1. Call the people in the hospital. Is the person in charge of cleaning the nebulizer the SAME as the person in charge of using (administering the medicine) the nebulizer?
If they are indeed the SAME person, then it will be easier to deploy this idea, and to get them to employ our new method. Further, it has been suggested to us that we implement some sort of device that detects how clean certain parts of the device are. Especially the nozzle part. Maybe we can add some sort of thermochromic ink to the nozzle, that will change color if there are foreign particles on the nozzle. Further, we could also add a component that releases some chemical and colors the nozzle when tube is detached from the nozzle (ie. when the treatment is finished and the doctor/nurse needs to take the tube off). This would work in similar way as chemicals that are put on children's teeth to tell them how clean the teeth are. The color would disappear after the nozzle is washed thoroughly.
2. Why do the children prefer NOT to use the mask?
Is it uncomfortable for them? If this is the case then we can make masks that are themed, and more suitable for pediatric use. These would encourage the kids to use the mask and decrease the discomfort while using it.
3. Make mouthpieces out of cardboard - print them on laser cut paper, that can be easily cut and assembled with oragami techniques.
Experiment with Nozzle
by [RC]
We tried to substitute the complicated (not that complicated) piece that floats in the nozzle (the thing with the spokes) with simpler parts. We took a pen cap and poked a hole through the top. Then put the pen cap onto the nozzle. It didn't work efficiently because the cap was too wide, it created too much space between the pen cap and the pole that is on the nozzle. So then we took a syringe cap, and put it over the pole. And poked 3 small holes on the top of the syringe cap. The syringe cap originally did not fit over the pole on the nozzle so we heated it up and expanded it, but pushing a screwdiver head through the cap. This worked to some degree. The syringe cap fit very well, and there was very little space between the cap and the pole on the nozzle. There was some aerosolization here. Our concern about this is, whether or not we really need to simplify this component, because it is already very simplified. Then we thought maybe we can add some detection component to the nozzle that tells us whether or not the nozzle is cleaned thoroughly.
Thermochromic Inks
by [RC]
To test wether something is clean:
Instead of modifying the nozzle to make it "easier to clean",
What if we make the nozzle out of aluminum so that it can be autoclaved. AND we paint the nozzle with thermochromic ink that changes color when you heat it up (ie. autoclaved). Therefore when you take it out of the autoclave it is colored differently. This could signal to the user that the nozzle was cleaned well enough.
The challenge with this is that even though the color will change after its heated, once the nozzle cools down the color will change back to original color. Can you modify this so that the color change (when its heated) will trigger some sort of chemical or electrical reaction so that some other component on the nozzle will change color, indicating that its been cleaned with autoclave?
Also, what if they don't have autoclaves. What can we do then?
References
Homola, J. "Color-Changing Inks." Jan. 29, 2003. (Accessed Sept. 29, 2009.)
One-way Filter Design for Tube
by [RC]
So the one-way filters we ordered have not arrived yet. In the meantime, Jose gave us an idea for making a cheap one-way filter. It is shown here. We attach plastic flaps to the filter. If air blows one way, the flaps open and let air through. (ie. if medicine is flowing out of the tube) If air blows the other way (into the tube), the flaps close, and air cannot enter back through the tube. This would prevent contamination of the tube, by reducing the amount of germs that can enter back into the tube.
The one-way filter design.
New Plans
by [LO]
For the nozzle portion, we're now going continue to use the manufacturer's design but assemble it using an easy-to-clean material such as metal so it can be autoclaved. Also, to add to this effect, we are going to try to incorporate thermosensitive inks as an indicator of cleanliness. The manufacturer I contacted didn't have the right materials. We still need to figure out how to incorporate it such that once it hits a particular temeperature, the color remains, but after use the color changes again. This will be tricky part.
As for the tubing and mouthpieces, because carboard works, we may use that as the solution. It could be a fun activity for the children to draw/assemble their own mouthpiece/mask then use it.
Contacting Nicaragua
by [LO]
Time differences are frustrating. It has been difficult to find the doctor who is in charge of administering and sanitizing the nebulizer. We emailed Dr. Orozco and Ximena a couple days ago and have yet to hear back. They're out of Managua so far, making the contact more difficult to obtain. After some brief searching on Skype, we managed to possibly find Dr. Orozco's username; however, upon asking Jose, we realized that we had added a random person with the same name.
To make sure our device and direction is again okay:
1. We wanted to ensure the approximate age of the users.
To make the mouthpieces and masks more user-friendly, we thought it would be good to put "fun" designs on the sheets and then allow the kids to color/decorate/create their own (with a little supervision). This would make them happier to use it. From our tests of using make-shift cardboard mouthpieces and tubing, it looks like we can insert things over the previous length and it won't leak as long as the dimensions are not too inaccurate.
2. Why they don't use it?
We want specific reasons besides discomfort.
3. Who cleans, how do they clean, etc.
Hopefully, we can find these solutions soon.
Designing the Mouth Piece
by [LO]
This was extraordinarily difficult for. I went through several, several drafts. I first attempted to draw lines to make the appropriate sloping plane, but because these did not intersect with with the cylinder, it just became a disconjuncted piece after removing obstructions. I tried to think of many "creative" ways of making the shape I wanted. After several hours, it dawned on me that I could simply intersect the cylinder with a large plane and then remove any unnecessary bits. Within a few seconds after that thought occurred to me, the mouthpiece was done.
The following shows a diagram and the fold out of the mouthpiece. This was the original design I was trying for, until I realized that it would be unnecessary to show thicknesses since we were doing a fold-out model.
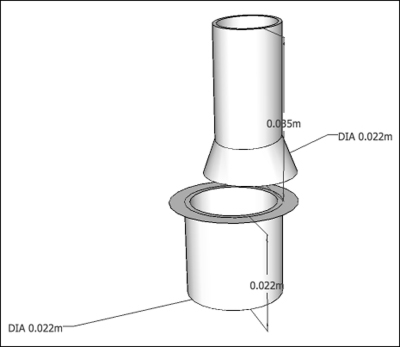
The original mouthpiece concept.
This is the final design and the accompanying cut-out:

Final mouthpiece design and cutout plan.
Upon looking at this and assembling the cutout, I realized that it was a little too complicated; granted that it mimics the manufactured mouthpieces.
Finalizing Design for Mouthpiece and Mask
by [RC]
We have finished designing the mask and the mouthpiece using Google Sketchup. There were multiple challenges in designing the mask. Several advanced techniques were used to fabricate a feasible model.
To make the mask, first a sphere was generated in Sketchup. Then, several rectangular regions were added to the sphere, and modified accordingly so that the rectangular regions protrude out of the sphere. Finally, holes were made in the mask. One hole was made in the rectangular region (colored blue on the figure). This hole is created for the nebulizer tube to connect to the mask. Two holes were created on the sides of the mask, to allow for to release air to the exterior of the mask.
These masks will be constructed out of cardboard paper. We will print the designs template onto cardboard paper, and this can be printed out and folded accordingly to create the mask.
In order to make the mask more interactive for pediatric patients, we decided to draw designs on the mask (so the mask looks like a face), that the children can color in.
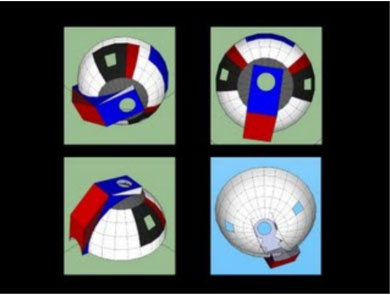
Sample mask and color design.
Air Motors
by [PH]
Wow, I haven't updated in a while. But with good reason! I was trying to find a good way to make an air motor, given that many of the air motors are far too expensive to buy.
Starting with a defunct nebulizer, I was able to extract the stepper part of the stepper motor, the fan, and the pump. Then, I was able to combine them back together, and add some wood.
In the end, we ended up with a good design for an air motor that would use pressurized CO2 to turn the fan, thus generating air from the air pump.
So, how we came up with the design:
-Thinking about reusability, local parts
-Several different initial designs
-Playing around with wood and the nebulizers
Tomorrow, I'm going to post a short guide that we've made about how to convert existing nebulizer motors to air motors.
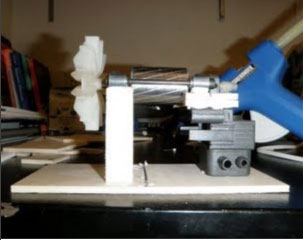
The final motor.
Assembling the motor parts.
Designing the Mouthpiece - Part II
by [LO]
I remembered the initial module we had on making spacers and mouthpieces/masks for a nebulizer. Drawing back on the experience, I went back to sketchup to make a second model.
Spacer design.
This looks much easier to make and assemble. I will be testing it out soon.
On a similar note, I thought it might be feasible to make a connector tube out of paper, so I sketched up a couple designs. I'll also be testing it out soon too.
Design for the connector tube.
Experiment for Testing Valve
by [LO]
To test the efficacy for our valve, we've set up a simple experiment with help and guidance from Amit.
- Materials
- Spray bottle
- Ethanol
- Bacterial Culture
- One way valve ( our version and a manufactured)
- Nebulizer
- Plates
Procedure
- Grow up culture in LB broth
- Plate and allow growth by placing them in different (warmer parts of E34)
- Collect bacteria cultures using PBS or other buffered solution
- Dilute to a concentration similar to a sneeze or cough ~ 50-100 bacteria per "spray"
- Place in spray bottle. Clean nebulizer equipment well - all parts
- Run nebulizer, spray a 3-4 times (depending on concentration) through the mouthpiece
- Swab mouthpieces, tubing, medicine cup, and valve and plate onto different plates
- Grow up cultures and observe
Tomorrow, I will be heading over to Longwood to perform the experiments. The only thing I need to find is the spray bottle and collect our working nebulizer.
Finding CO2
by [LO]
After a long internet search, we discovered something about CO2 availablity - it can be found at larger liquor stores because of kegs. After calling the store to ensure that we would be able to purchase because we were underage, we headed over to Allston. The ride was confusing becuase the station was Harvard Ave, and we initially confused it with Harvard of the Red Line. I think the amount of time we spent on transportation was over 2 hours. This also included getting on the C Line instead of the B and walking abut 10-20 minutes to get to the store.
To our surprise, we found that they carded at the entrance. We couldn't even enter to purchase a CO2 tank. As a result, we called as many older people we knew. Finally, I was able to contact a friend from BU. He came over and helped us purchase a 5 lb tank. It's great to have friends who would go out of their way to help out.
By the time we got back to D-Lab, it was already midnight. We had left at around 8 pm. A quick test showed that the emitted pressure was far too high and disperse to use for our motor. Unfortunately, we did not know where to find a regulator for Saturday's presentation.
Last-minute Lasering and Public Presentation
by [LO]
Jose was able to help us obtain access to the lasercutter in the media the few hours before our presentation at the MIT Museum. Santiago (I think that is his name) helped us work with the software. Unfortunately, the pepakura files imported onto Corel caused some odd cuttings to occur, so he had to manually remove them, which took a long time.
Right before the presentation started, we finished all our pieces. they assembled very nicely together. Mostly, the valve also worked. We reworked it to include "sections". We'll still need to test it, but at least it works!
The presentation went quite well. We were able to get many good ideas from our poster session, particularly speaking with [anonymous student's] father.
- Pressure needed to work the nebulizer
- possibility of having someone pump compressed air to get it to function - ie. sell compressed air tanks and connect it directly to the nebulizer nozzle - this would remove the motor
These are fantastic ideas. The only problem I forsee is the expense of the tanks - leakage, regulators, etc necessary, but it should pay off in the end. We'll need to test this, but it would work as a great idea.
Found It!
by [LO]
- CGA valve
- 5 lb CO2 tank
- 5.2 bar
The oddity is the CGA valve, making it non-standard. The regulator was a bit expensive - around 65 without shipping, but 73 with. It was delivered this afternoon and in time for our valve tests (only coloring - no bacteria). Hopefully, we'll get great data with this!
On the other note, I tested the psi necessary for aersolization and found that we need at least 10 psi to get some out, but a consistent amount would be around 13-15.